Nicoka - Silae connector
The Silae connector sends your employees' records and their absences approved in Nicoka to your Silae payroll software. This article explains how to create and set up the Silae services, and how the sending works.
Renewing the Silae API access keys is covered in a dedicated article: Silae - API - Renewal of Access Keys.
The two Silae services
The connector is made of two independent services, which you create as needed:
- Silae - Employees Synchronization API: creates your employees in Silae and updates their personal data;
- Silae - TimeOff Synchronization API: sends the absence requests approved in Nicoka to Silae.
Not to be confused with: the Silae tile in Customizing > Integrations (tagged Beta) connects a shared Silae account, used to compare leave balances between Silae and Nicoka. It sends neither employees nor absences.
Before you start
- Your Silae API access keys: Client ID, ClientSecret and Ocp-Apim-Subscription-Key. They are generated on the Silae API portal (see the article on renewing the keys).
- The Silae dossier number of each company, entered in the company's Code field in Nicoka (or the department's, the location's… depending on the choice made in the settings, see below).
- The employee number of each employee to send: without it, the employee is not sent.
- For absences: the list of your absence item codes in Silae. Ask your payroll manager for it.
1. Create a Silae service
- In the side menu, open Customizing > Admin.
- In the Cross Application section, click Services.
- Click Create a new service.
- Enter a Label, choose the Type Silae - Employees Synchronization API or Silae - TimeOff Synchronization API, then click Create.
The service appears in the list, inactive. On its row, the padlock icon (Pwd column) is used to enter the keys, and the cogs icon opens the settings.

2. Enter the access keys
- On the service's row, click the padlock icon.
- Enter the Client ID, the ClientSecret and the Ocp-Apim-Subscription-Key, then click Update.
These keys are confidential: never send them by email or in a ticket. If you create both services, enter the keys on each of them.
3. Set up the sending of employees
On the row of the Silae - Employees Synchronization API service, click the cogs icon.
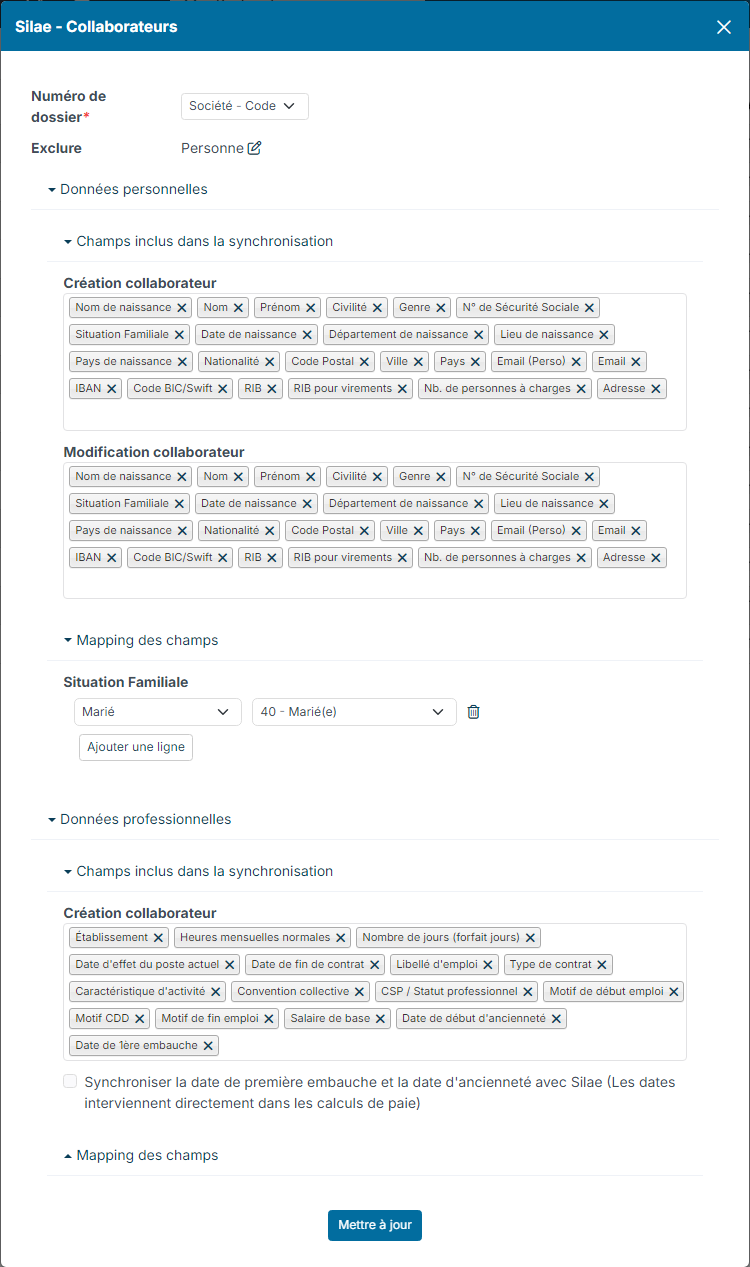
- Dossier number: tell Nicoka where it finds each employee's Silae dossier number, for example Company - Code (the code of the employee's company). If you manage several companies, each one carries its own code: a single service is enough.
- Excluded: the employees never to be sent to Silae.
- Personal data > Fields included in synchronization: the fields sent on Employee creation and on Employee update (last name, first name, social security number, address, IBAN…). Remove those you do not want to send; if a list is empty, all fields are sent.
- The City field also sends the commune and its INSEE code, which Nicoka finds from the employee's zip code and city. For Paris, Lyon and Marseille, the code of the commune is sent, not that of the arrondissement. Removing City also removes the commune and its INSEE code.
- Field mapping > Civil Status: match each Nicoka civil status with the corresponding Silae code (10 - Célibataire, 40 - Marié(e)…). Click Add row for each value. Without a match, only the Single and Married values are converted; the others are not sent.
- Professional data: the contract-related fields (establishment, contract type, job title, collective agreement, base salary…) and their matching Silae codes. This data is sent when the employee is created in Silae only. The Synchronize first hire date and seniority date with Silae box adds these two dates, which are used in payroll calculations.
Click Update to save.
4. Set up the sending of absences
On the row of the Silae - TimeOff Synchronization API service, click the cogs icon.
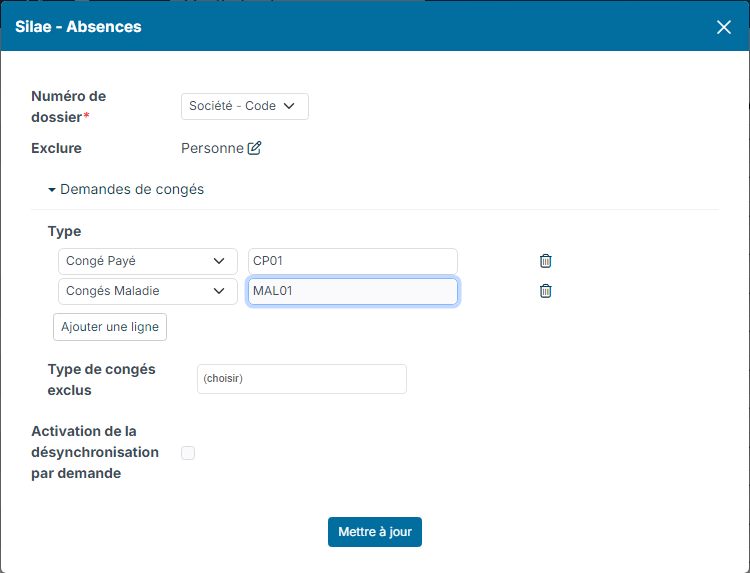
- Dossier number and Excluded: as for employees.
- TimeOff Requests: for each Nicoka absence type, enter the Code of the matching absence item in Silae. Click Add row to add one. The codes in the screenshot are examples: use those of your payroll plan.
- TimeOff Type excluded: the absence types you do not want to send to Silae.
- Enable per-request desynchronization: lets you remove a given request from the sending to Silae.
Click Update.
5. Activate the service
In the list of services, click in the Active column of the service's row. Nicoka refuses the activation as long as the access keys are not entered.
How the sending works
- Employees: any change to a record marks the employee as to be synchronized. The employees sent are those with the New, Active or Resigned status, who have an employee number and are not excluded.
- Absences: an approved request is marked as to be sent. The requests sent are those starting no later than the first day of the following month. A request already sent and then cancelled in Nicoka is deleted in Silae.
- Scheduling: the sending is done by automatic processes, scheduled by the Nicoka team when the connector is set up. Write to support@nicoka.com to set them up or change their frequency.
If something goes wrong
- Expired key: the ClientSecret has an expiry date. Once it has expired, exchanges fail: renew the keys by following Silae - API - Renewal of Access Keys.
- Absence type without a code: the request is not sent and a "Missing mapping" error is reported. Add the mapping in the service, or exclude this absence type.
- Employee not sent: check their employee number, their status, that they are not excluded and that the code of their company (or of the level chosen in Dossier number) matches a Silae dossier.
- Commune not recognised: the employee is sent, but a warning reports that Nicoka could not find their commune from the zip code and city entered (typo, incomplete name, zip code that does not match the city). Their INSEE code is then not sent, and Silae keeps the one from the previous address. Open the employee's record, pick the city from the suggestions offered while typing, then send it again.