Sequences in the ATS: automate your outreach to candidates
Goals
- Automate your outreach: a sequence chains your messages and follow-ups to candidates, in order and at the right time.
- Combine channels: email, SMS, WhatsApp, LinkedIn invitation, message and InMail, in a single sequence.
- Stay in control of the pace: delays, conditions, tasks for you, and a stop as soon as the person replies, with a Has replied branch.
- Track the results: each step shows what was sent, what was not sent and what was passed.
What is a sequence?
A sequence is a chain of steps: a message to send, a wait, a condition to check, a task to create… You build it once in a visual editor, then you enroll candidates: each of them goes through it at their own pace. A reply does not stop the sequence on its own: a Has replied branch does, see Stop the sequence when the person replies below.
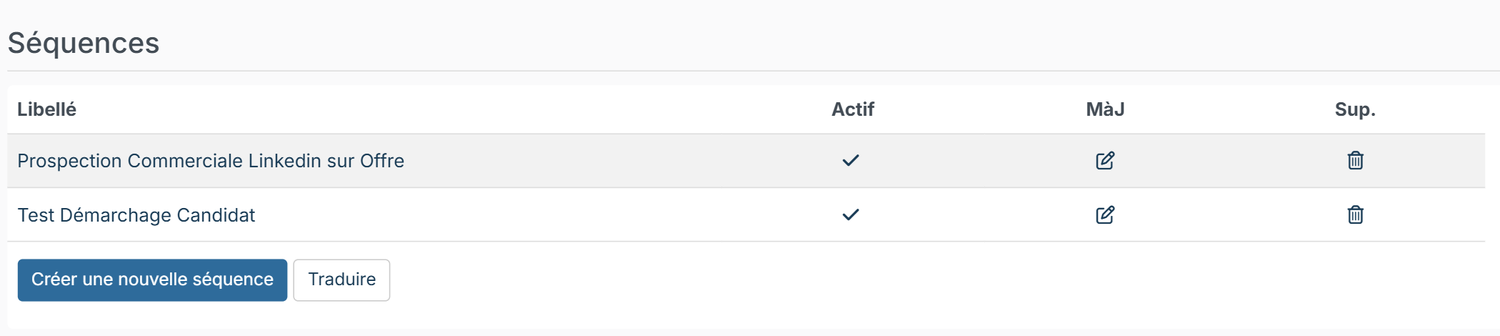
A sequence is aimed at one type of person, its target: Candidate, Contact or Employee. This article covers sequences with the Candidate target, the ATS ones. They are set up in Customizing > Sequences.
For a complete step-by-step example, with a LinkedIn invitation followed by an InMail, see Create a LinkedIn sequence and start it on your candidates.
Create a sequence
- Open Customizing > Sequences, then click Create a new sequence.
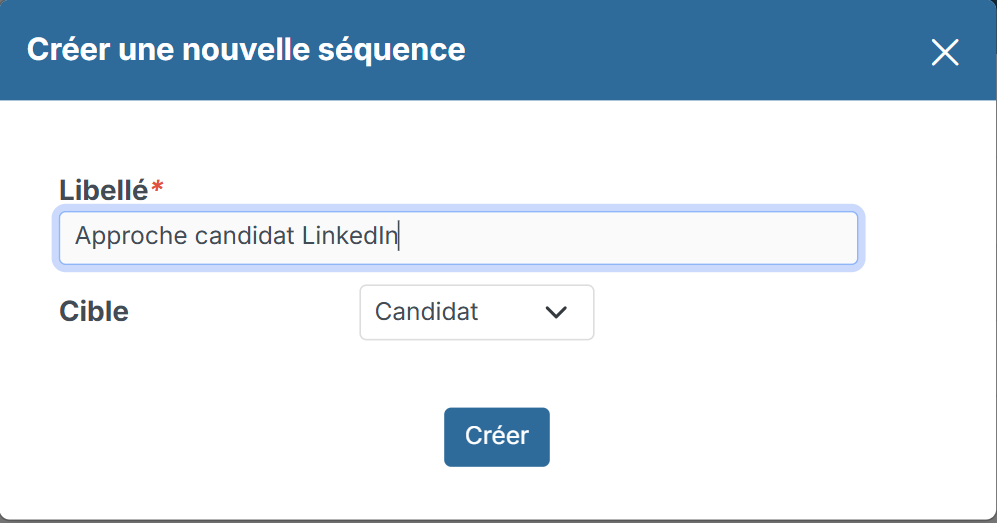
- Enter a Label and choose the Target: Candidate.
- Click Create: the editor opens.
The badge next to the title shows the state of the sequence: Ready to launch, or the number of warnings to fix.
The steps of a sequence
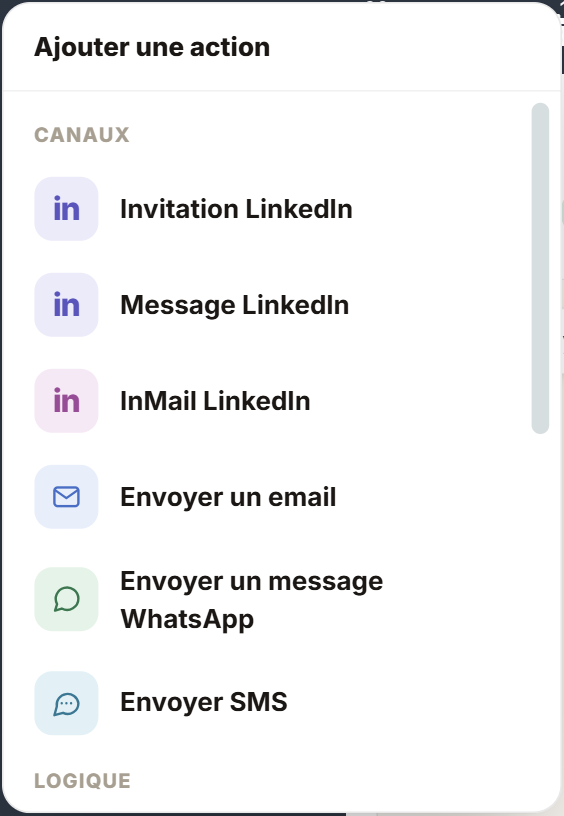
In the editor, the Starting point is at the top and the steps follow one another from top to bottom. Click the + on a line to add a step, then click the step to set its content in the right-hand panel. Each step carries a delay in days, counted from the previous step: 0 means "right away".
To reorganize the sequence, drag a step onto another +; a branch moves with its Yes and No paths, to the end of a path. When you hover over a step, Duplicate creates a copy right below it, and Copy this step and what follows copies the step with everything after it: then click a +, and Paste the copied steps. A copy that contains a branch is pasted at the end of a path.
Contact channels
- Send an email: a subject and a body, or an Email Template from your account. The template is sent as it is. To adapt it to one step without changing it, click Customize for this step below its preview: its subject and text, variables included, are copied into the step, without the formatting or its other languages.
- Send a SMS: a Message Template or free content.
- Send a WhatsApp message: from the WhatsApp account of the user who runs the sequence.
- LinkedIn invitation: a connection request, with a note of 200 characters at most.
- LinkedIn InMail: a LinkedIn message with a subject, including to someone outside your network.
- LinkedIn message: a LinkedIn message without a subject, for your connections only. LinkedIn refuses it to someone who has not accepted your invitation: place this step on the Yes branch of a Has accepted condition.
Contents accept variables that personalize each message: type / or click First Name, Last Name, Wanted Job, or Add a variable to choose another one.
Logic
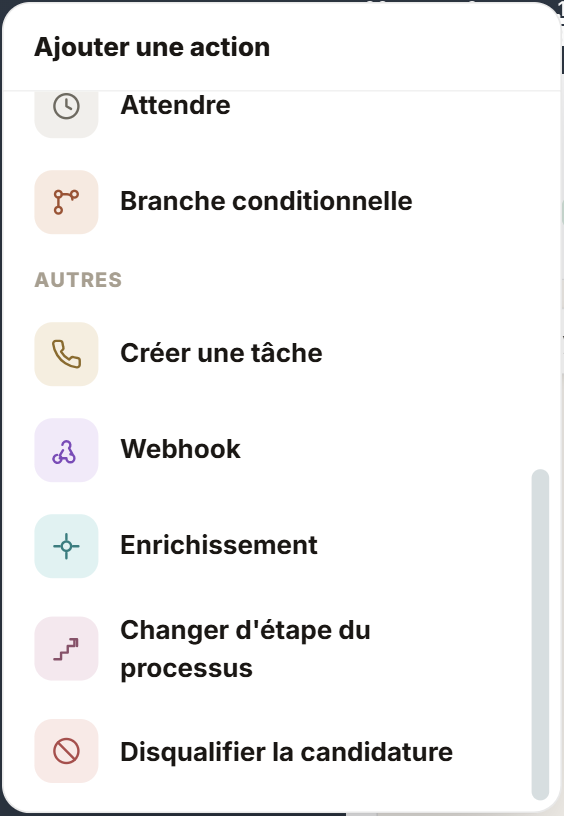
- Wait: a pause, in days, before the next step. Like every step delay, it is a fixed wait after the previous step: 1 day means 24 hours later. A send that falls due outside the sending hours goes out at their next opening, and the delay that follows an invitation, a WhatsApp or LinkedIn message or an InMail starts when it is actually sent, not when it is queued.
- Branch: the sequence follows the Yes or the No branch depending on a success condition: Has accepted, Has replied, Was messaged on LinkedIn or Is open to work. For the first three, the branch delay is a maximum wait: the sequence follows the Yes branch as soon as the event happens, within a few minutes, and the No branch if it has not happened by the end of the delay. Is open to work is read at the end of the delay.
- Branch on the record: three conditions are read on the candidate's record when the branch is reached, without waiting: Has an email address, Has a LinkedIn profile and Has a phone number. They adapt the sequence to what the record allows: a Has an email address branch at the top of the sequence, your email steps on the Yes branch and your LinkedIn steps on the No branch; or a Has a phone number branch that creates the call task only for candidates who have a number. When you pick one of these conditions, the branch delay is reset to 0.
Stop the sequence when the person replies
A reply does not stop the sequence on its own. To stop it as soon as the person replies, place a Branch set to Has replied after each message that is followed by a follow-up:
- Set the branch Delay to the wait you want before the follow-up, for example 3 days.
- Place the follow-up on the No branch, with a delay of 0: the wait is already carried by the branch.
- Leave the Yes branch empty: the sequence ends for the person who replied. You can also add Change the process step there to move their application forward.
As soon as Nicoka receives the reply, the person goes through Yes without waiting for the end of the delay. LinkedIn, InMail and WhatsApp messages count, as well as emails that arrive in a mailbox connected to Nicoka and are linked to the record, received since the person reached the branch.
In an existing sequence, a branch inserted between two steps puts what follows under Yes: drag the following steps, one by one, under the No branch.
The sequence also stops when you click Stop the sequence in the record's timeline and, for a sequence started from a job, when the application changes step or is disqualified.
Other actions
- Create a task: a task for you, with a title and a task type (Recall, Free Text…).
- Webhook: calls an external address, with the POST, GET or PUT method.
- Enrichment: starts the enrichment of the record with one of your connected providers.
- Change the process step: moves the application to the chosen recruitment step.
- Disqualify the application: disqualifies the candidate with a Disqualification reason and comments. A checkbox lets you send the disqualification email to the candidate or not.
The starting point
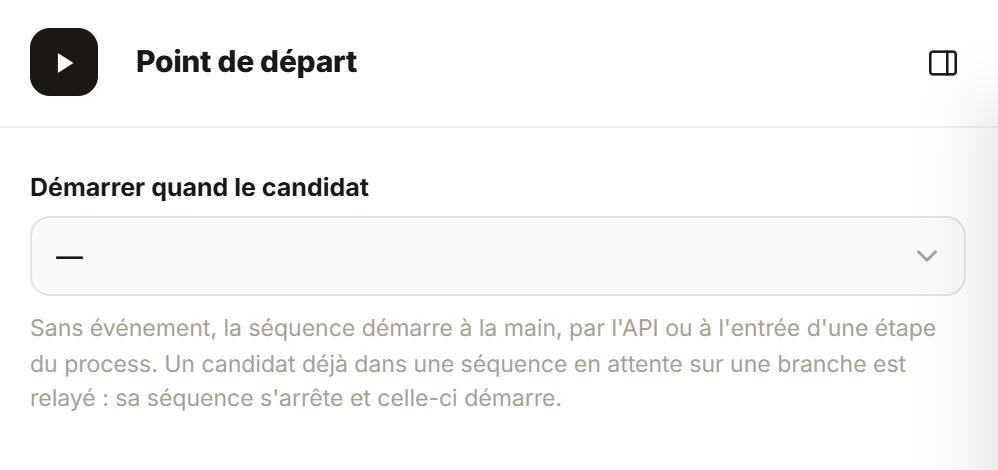
Click Starting point to choose when the sequence starts. In Start when the candidate, you can wait for an event: Has accepted, Was messaged on LinkedIn or Has replied. Without an event, the sequence is started by hand, through the API or when the candidate enters a process step. A candidate already in a sequence, waiting on a branch, is handed over: their sequence stops and the new one starts.
Enroll candidates
By hand
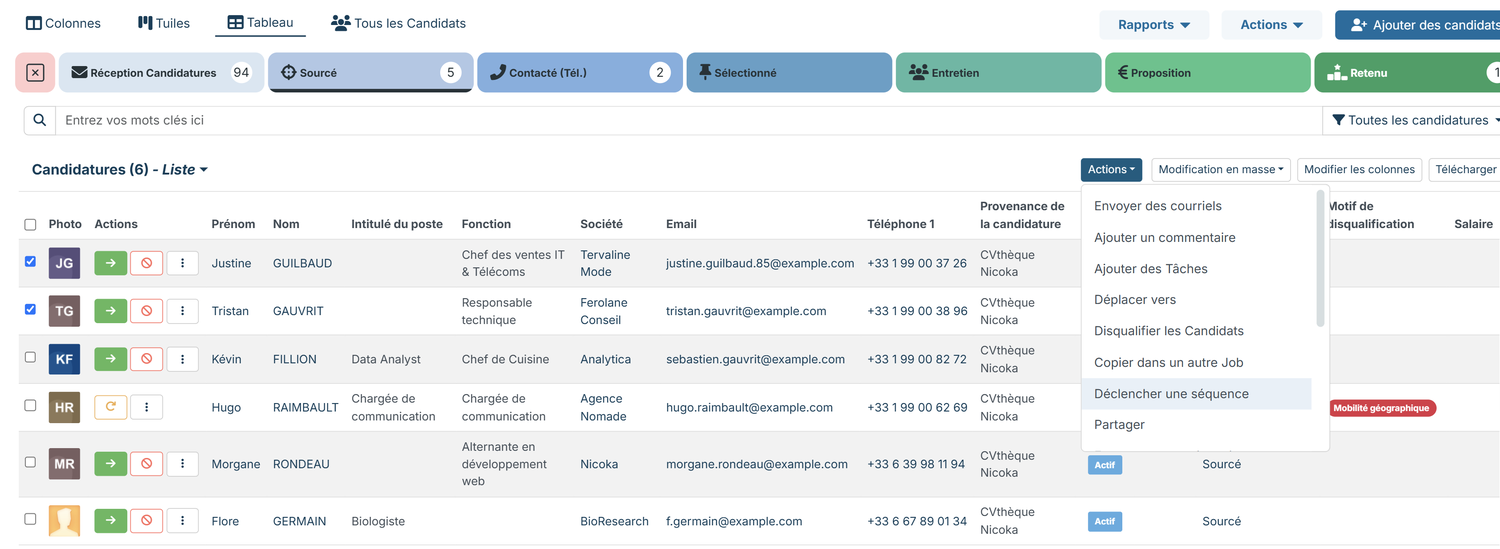
- From a job page in Table view, or from the CV library, tick the candidates.
- Click Actions, then Enroll in a sequence.
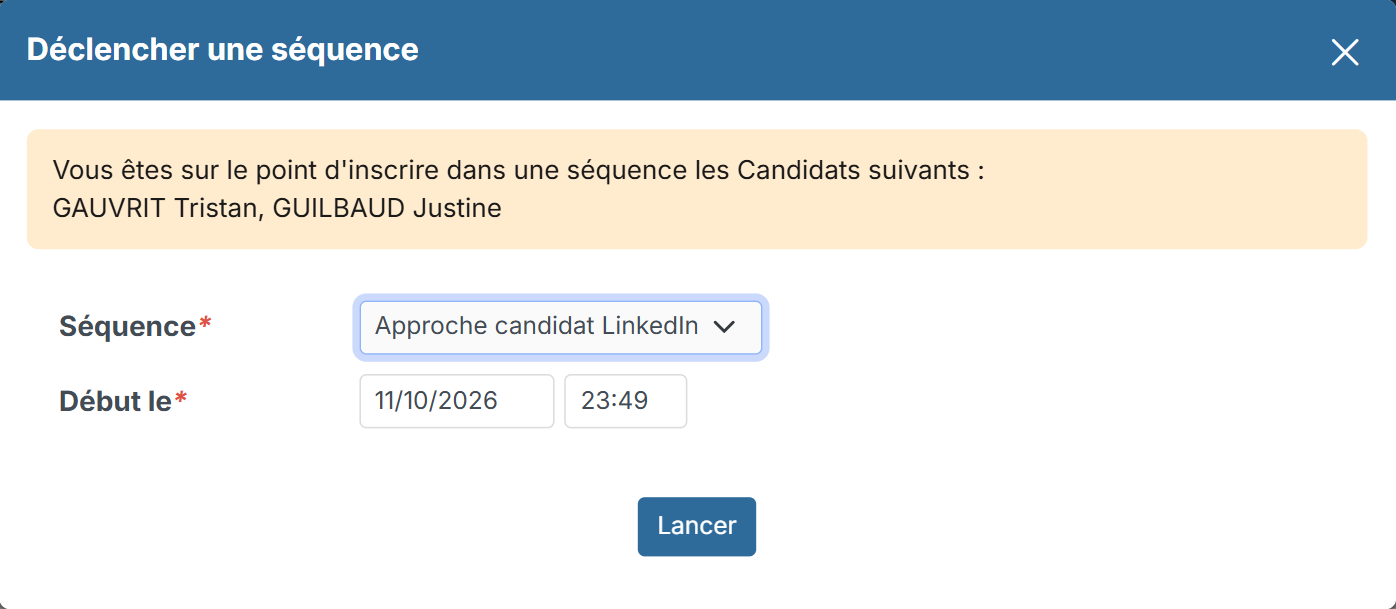
- In the window, check the candidates, choose the Sequence and the Start On date, then click Start.
One at a time, with a personalized first message
To adapt the first message to each candidate without creating one sequence per person, a shared sequence can hand its first message over to whoever enrolls the candidate.
- In the editor, click the first step of the sequence (email, LinkedIn invitation, InMail, LinkedIn message or WhatsApp) and turn on Can be personalized at enrollment.
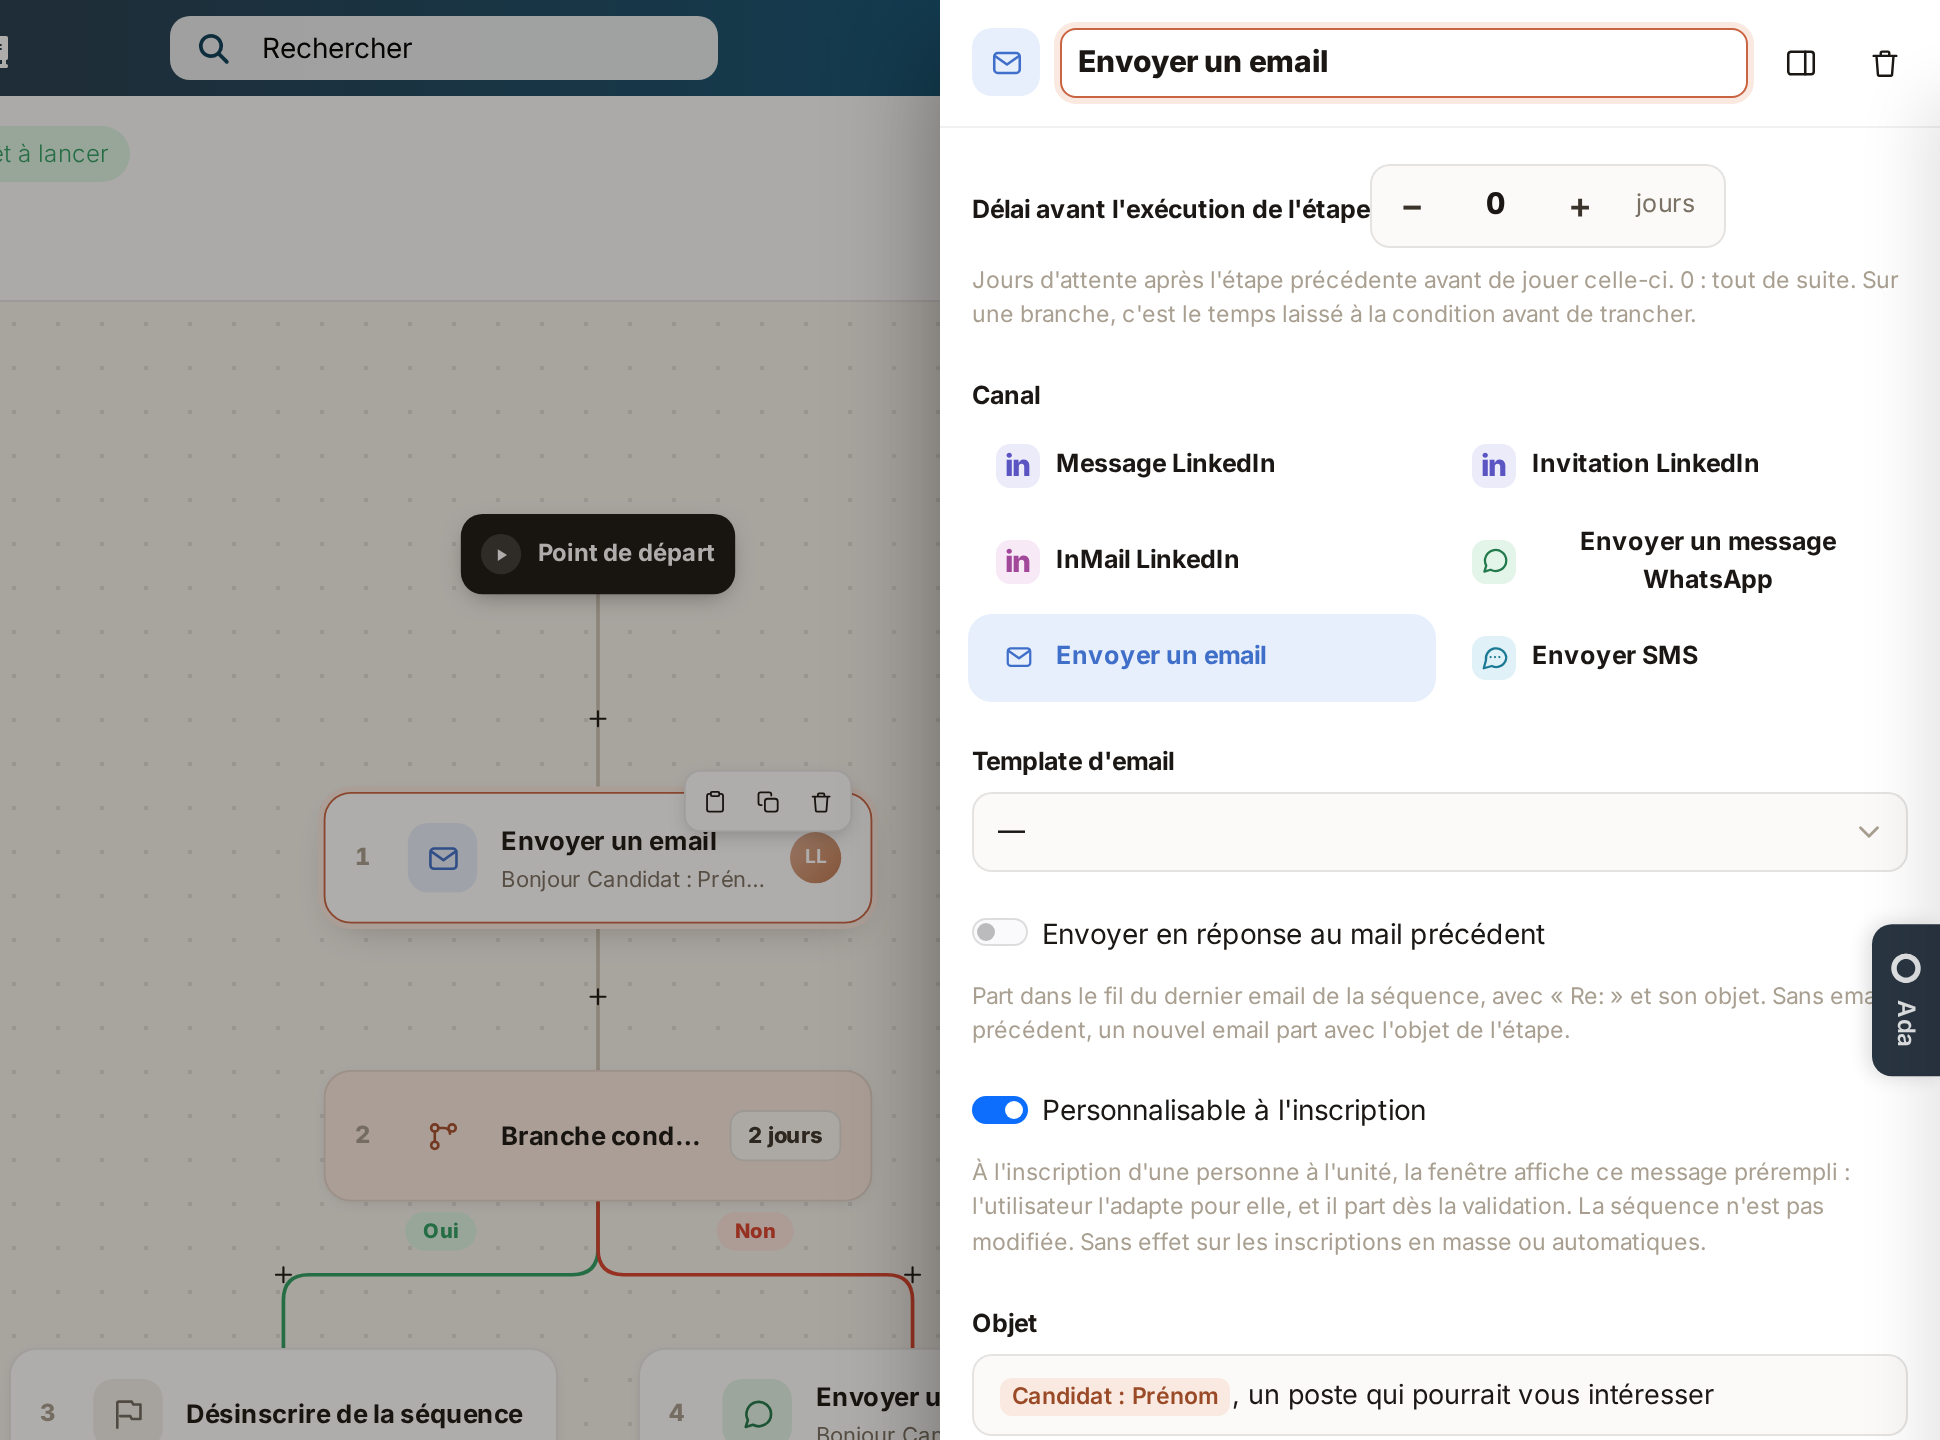
- From a candidate's record, click Enroll in a sequence and choose this sequence: the window shows the First message, pre-filled with the text of the step, its variables already replaced.
- Adapt the text for this candidate. For an email, when the record is opened from a job, tick in Attach existing documents the documents of the job to attach, the job description for example.
- Click Start.
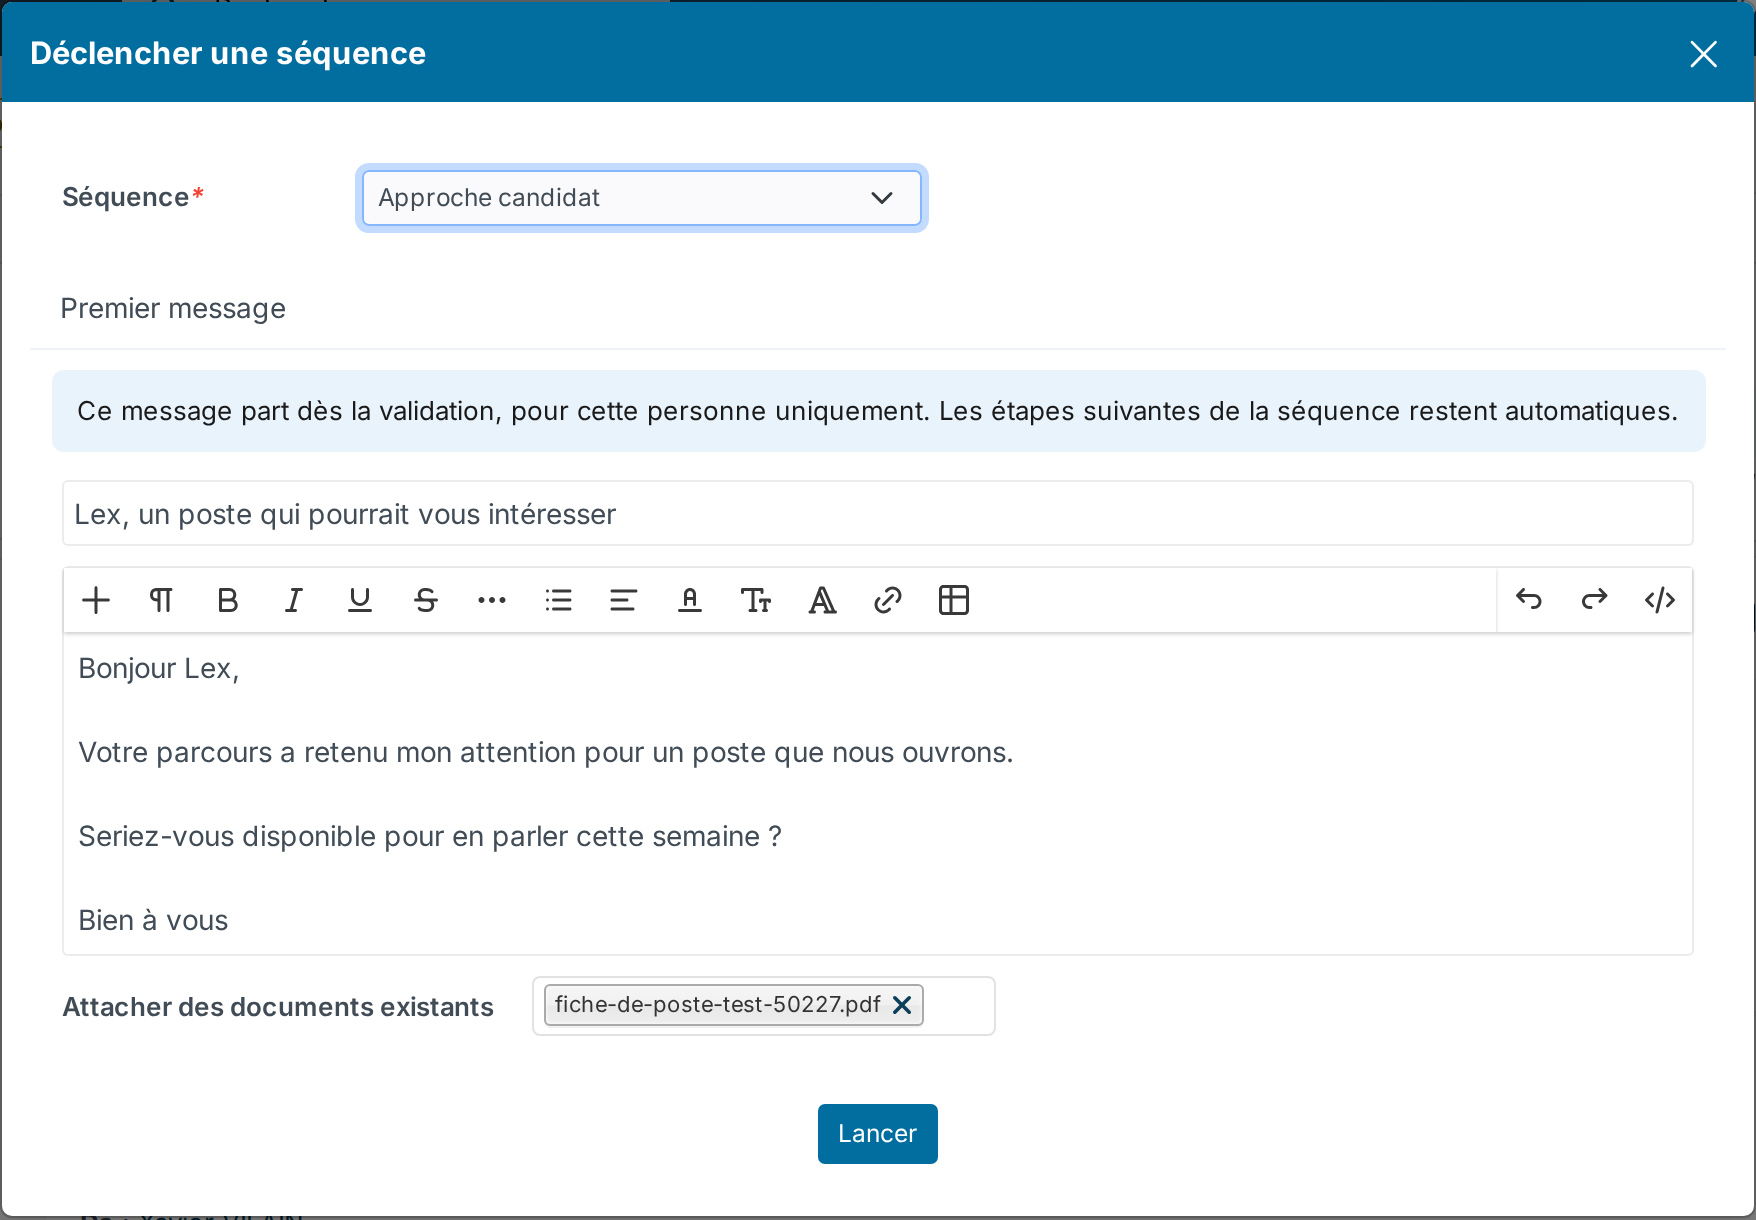
- The first message leaves as soon as you confirm, without waiting for the delay of the step or the sending hours. The next steps stay automatic.
- The text only applies to this enrollment: the sequence is not changed.
- A LinkedIn or WhatsApp message too long for its channel is refused, with the length allowed.
- The option has no effect on a bulk or automatic enrollment: the sequence then sends its own text.
- With the MCP connector, your AI assistant can prepare this first message: a row "waiting for your review" appears in the candidate's timeline, and the Review the first message and start the sequence button opens the pre-filled window. Nothing leaves before you confirm.
Automatically, when a candidate enters a process step
In Customizing > Modules > ATS card > Customizing > Jobs > Workflows, open the process, then edit the step you want: the Start the sequence field, in the Application section, starts the chosen sequence as soon as a candidate enters the step.
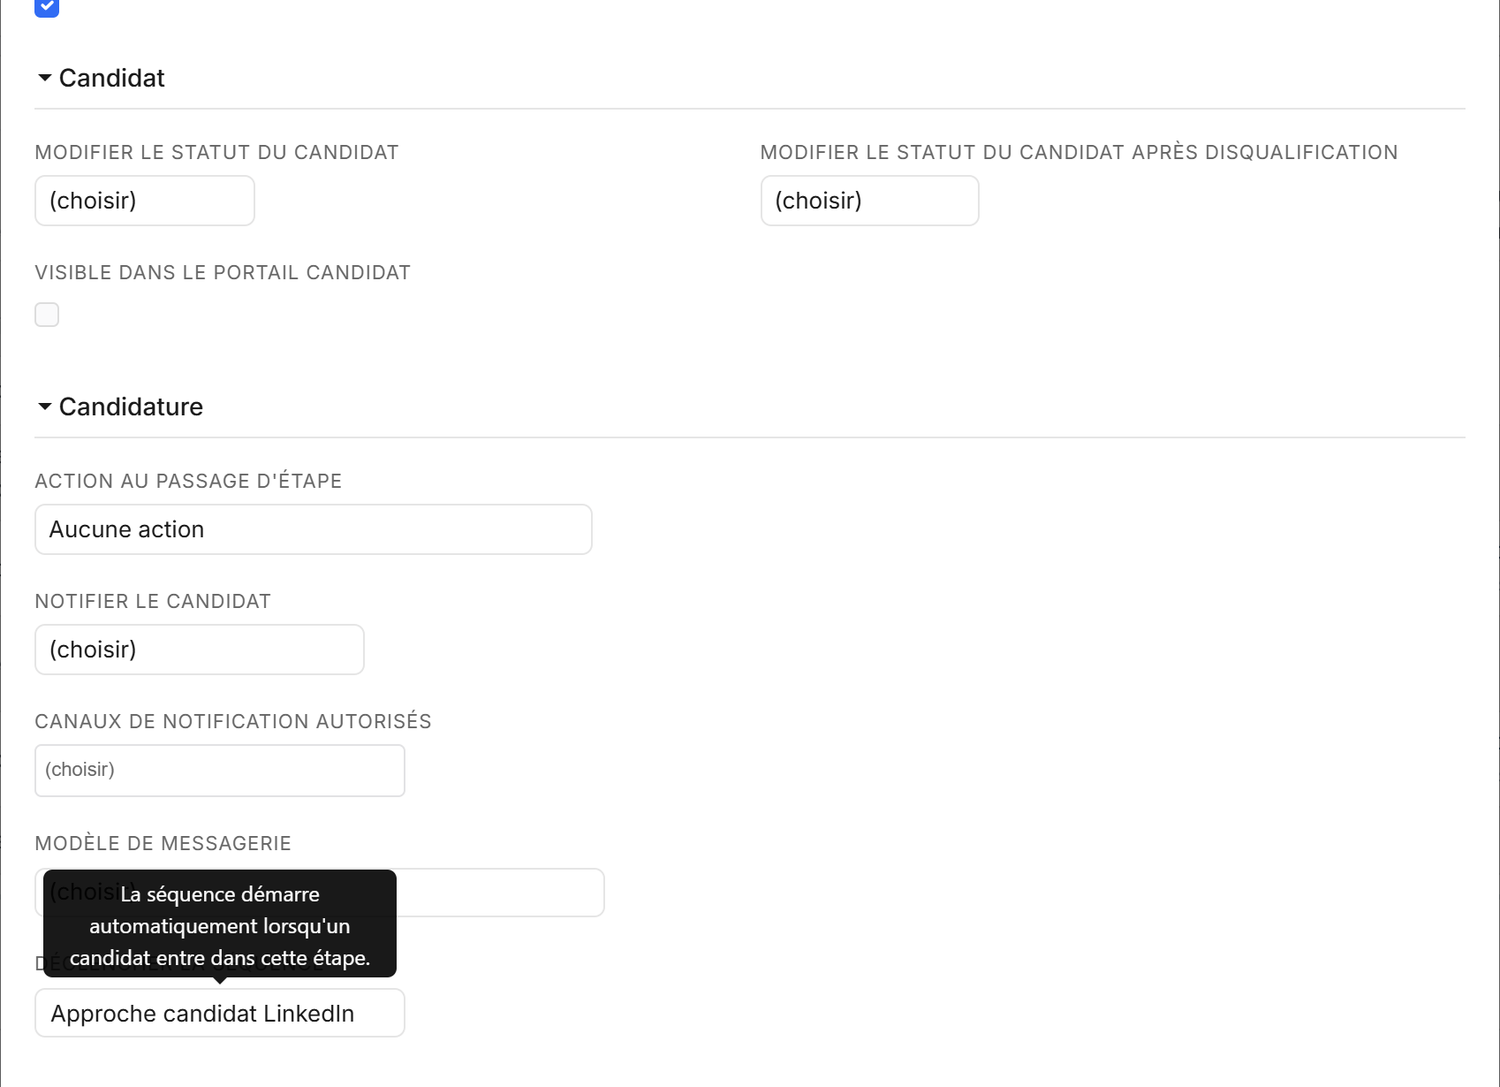
- The field only appears if your account has at least one sequence with the Candidate target.
- A candidate already engaged in a sequence is not enrolled a second time.
- A deactivated sequence no longer enrolls anyone from the step. The field keeps it, marked (Disabled): once reactivated, it enrolls again the candidates who enter the step afterwards, not those who arrived in the meantime.
- This setting is independent of the candidate notification: a step can send an automatic email and start a sequence.
The step-by-step details are in Update the recruitment process in Nicoka.
Track a sequence
In the editor, the Reports menu offers Step Targets. This screen shows, for each step, the number of sends Sent, Not sent and Passed, with a rate, then the list of enrolled people with their step, their status and the date. This is where you spot a step that sends nothing. For an acceptance or reply rate, compare the count of the step that follows the Yes of a branch with the count of the branch. The Actions menu lets you Duplicate the sequence and view the Change log.
The Reports menu also offers Enrolled people: the list of the people enrolled, with the step they wait on, the date of their next action, their status and, for a sequence started from a process, the job. The Running, Paused, Completed, Stopped and All tabs sort the enrollments by state, and the search finds a person by name. Check rows, then pick Stop the sequence, Pause the sequence or Resume the sequence in the Actions menu of the list.
On a person's record, the sequence activity in the timeline shows the steps already run, then the step it is waiting on with the date it will be played (Planned on; for a condition, By … at the latest, since a reply or an accepted invitation settles it earlier), and a queued LinkedIn or WhatsApp message shows with its planned time; when a sending limit of the account holds it back, the reason shows when hovering its pill. For an overview, add the Last Sequence, Sequence Step and Sequence Status columns to the candidate list.
A Show in selector lets you write the contents in several languages.
Pause, stop or change a running sequence
- To pause one person, click Pause the sequence on the sequence activity in their timeline. Resume the sequence takes them up where they stood, without replaying the steps already done, with the wait they had left.
- To pause the whole sequence, open it in Customizing > Sequences, then click Actions > Pause the enrolled people. Resume the enrolled people resumes everyone paused, those paused one by one included.
- Nothing goes out during the pause: a LinkedIn invitation, a WhatsApp or LinkedIn message or an InMail still waiting in the sending queue is withdrawn, and goes out again on resume. Stopping the sequence withdraws it too, as does a disqualification or a reply that ends it: nothing goes out afterwards. A reply or an accepted invitation received during the pause is taken into account on resume. The person stays enrolled: they cannot enter another sequence, and their sequence still stops if the application moves to another step or is disqualified.
- Unchecking Active removes the sequence from the enrollment lists, stops its start rule and keeps a process step that holds it from enrolling the candidates who enter it. The people already enrolled carry on: pause them to interrupt them too.
- To stop one person, click Stop the sequence on the sequence activity in their timeline. Enrolling them again starts them over from the first step: their first messages go out again. For a temporary interruption, prefer the pause.
- To stop, pause or resume several people at once, open Reports > Enrolled people on the sequence, check the rows you want, then pick the action in the Actions menu of the list. To stop everyone at once, click Actions > Stop the enrolled people on the sequence.
- A change to the sequence applies to the people already enrolled from their next step on, but the delay they are already waiting keeps its value. Deleting the step a person is waiting on ends their sequence.
Sending rules
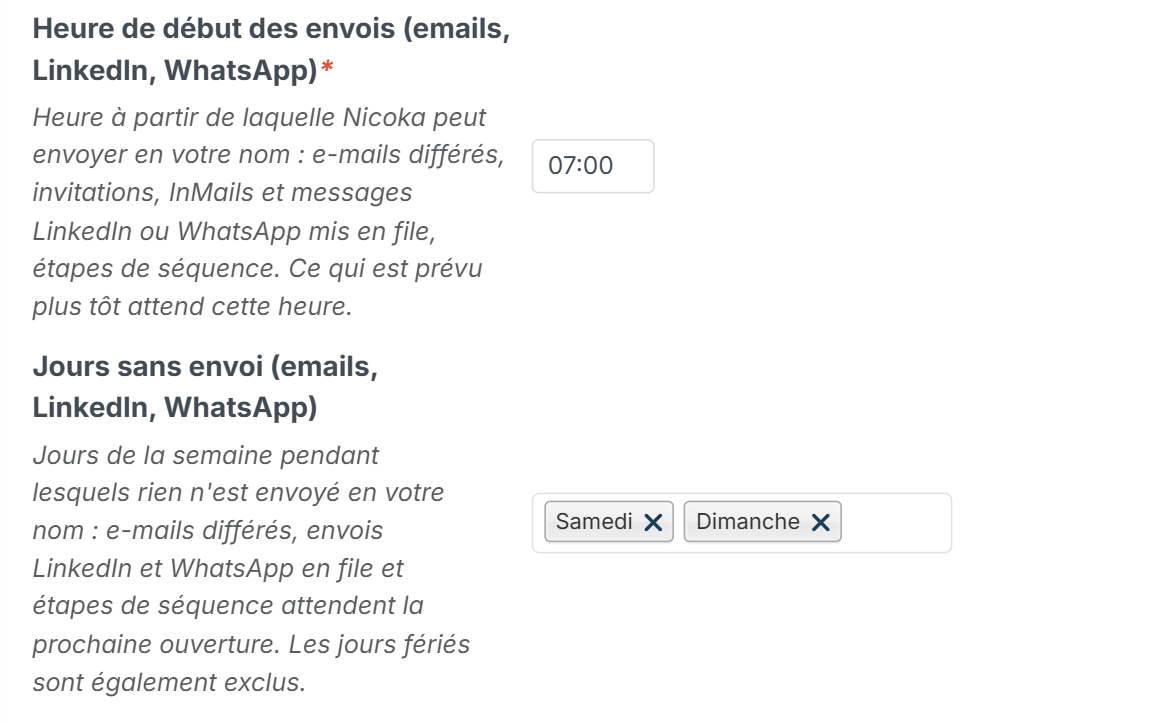
Sends go out on your behalf and follow your account settings, in Customizing > Configuration: Sending start time, Sending end time and Days without sending (public holidays are excluded too). A step due outside these slots waits for the next opening. A email sending limit per sender domain over 24 hours also protects your sender reputation.
LinkedIn messages and invitations go out one at a time, in the order they were queued, across all sequences, each kind of action at its own pace: a message every 3 to 10 minutes, an invitation every 1 to 10 minutes, until 9 pm. Invitations are also capped by the quota of the LinkedIn Account type declared in your Integrations (20 a day and 100 a week for LinkedIn Classic (free)): beyond it, they wait for the next day. Enrolling many people on the same day therefore sends the messages well before the invitations: declare the right account type, or spread the enrollments over several days.
Good to know
- For LinkedIn, your account must be connected in your Integrations: if the account is "disconnected", click Reconnect.
- An invitation note makes the acceptance visible immediately, but a free LinkedIn account can only send about 5 invitations with a note per month.
- A sequence is tied to a target: you can only enroll candidates in a Candidate sequence.
Troubleshooting
- "This step will send nothing while its content is empty": open the step and write its content.
- "None of the steps of this sequence can be sent yet": enrolling a person would be refused. Add a step on an available channel.
- The "Start the sequence" field is missing from the process step: first create a sequence with the Candidate target.
- The sequence goes on although the person replied: a Has replied branch is missing after the message, see Stop the sequence when the person replies.
- Nothing goes out: check the sending hours and days of your account, then the Step Targets screen.