A job's pipeline: the screen and its options
The pipeline is a job's workspace: it gathers the job's applications, sorted by the steps of your recruitment process, along with everything needed to move them forward. Open it by clicking a job in the jobs list.
Depending on your setup, the object is called Job, Position or Assignment, and the steps carry your own names, so the labels on your screen may differ slightly from this article. Some entries only appear when the feature is enabled for your company and your profile is allowed to use it.
The screen at a glance
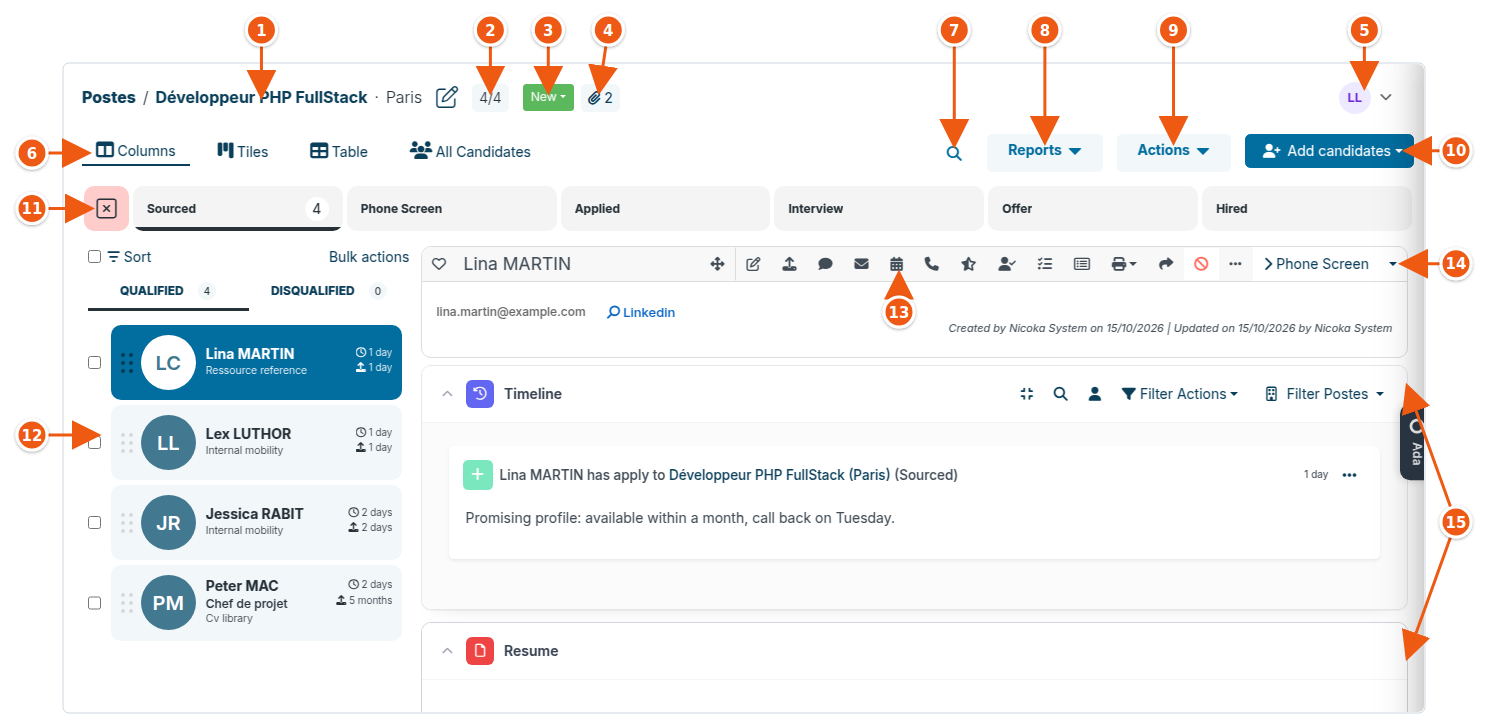
Job header
1. Job title: preceded by the client and, when there is one, the originating opportunity, followed by the city. Clicking the title or the pencil opens the job sheet. When the option "Show the reference in label on the job pipeline?" is ticked (ATS settings, Customizing points, Pipeline section), the job reference appears in a chip just before the title. The same option also shows the reference on the cards of the jobs pipeline, where jobs are sorted by status.
2. Counter: number of qualified candidates out of all the job's applications. "4/4" means no candidate has been disqualified.
3. Job status: click it to change the status without leaving the pipeline.
4. Shortcuts: the paperclip opens the job's documents (job description, client brief…) in a panel on the right of the screen. The "LinkedIn project" badge appears when the job is linked to a LinkedIn Recruiter project, and a HubSpot icon when it is linked to a HubSpot deal.
5. Owner and team: the person in charge of the job and the colleagues working on it. The menu lets you change the owner or add team members.
Toolbar
6. Display modes: Columns shows one step at a time, with its applications on the left and the open application on the right. Tiles shows all steps side by side, one card per application, which you drag from one column to another; the Sort menu is added there. Table lists the applications as a grid, with its own search. All Candidates lists every application of the job, whatever its step.
7. Search: the magnifying glass opens a keyword search across the job's applications, including the candidate record and the resume.
8. Reports: the conversion rate report between steps and the job's advancement report.
9. Actions: publish the job, cancel its publication, close or reopen it, and link it to a LinkedIn Recruiter project (Recruiter subscription required) to import its profiles.
10. Add candidates: search the talent pool to attach a candidate already in Nicoka, candidate matching and LinkedIn search when these features are enabled, Add a candidate to fill in a record, and Upload Resumes to drop several resumes at once: they are parsed and attached to the step of your choice.
Steps and applications
11. Process steps: one box per step, with its number of applications; click a step to show its candidates. The red box with a cross shows the disqualified candidates. Drag a candidate's card onto a step to move it there, or onto the red box to disqualify it: you are then asked for the reason. Hovering a tile shows a LinkedIn icon next to the selection box: it opens, in a new tab, the candidate's profile, or a LinkedIn people search on their name when the sheet stores no profile.
12. Applications list: the Qualified and Disqualified tabs split the step's candidates, and Sort orders them by name, import date, update date, source, state of mind, company or rating. Tick several candidates to apply a bulk action from the Bulk actions menu: send emails, add a note or tasks, disqualify or requalify, enroll in a sequence, send a form, move to another step, copy to another job, share or download the resumes, or Find the LinkedIn profiles of the candidates who have none yet: one search per candidate through your connected LinkedIn account, the profile attached to the sheet when a single one matches the name, yours to pick in the window otherwise. The same menu exists in the Tiles view (the « … » at the top of a column once tiles are ticked), in the Table view and on All candidates (the list's Actions button).
13. Application action bar: every action available on the open candidate, detailed in the next section.
14. Next step: the button moves the candidate to the next step of the process. The arrow on its right lists all steps, to pick another one.
15. Application sections: the timeline gathers notes, emails, calls and events, with filters and a search; the resume is shown below. In Tiles view, the sections of the panel are chosen in the settings.
The application action bar

A. Favorite: adds the candidate to your favorites.
B. Open candidate view: shows the candidate's full record.
C. Edit and upload: Update Candidate information and Import a resume.
D. Communicate: Add a note, Email Candidate, Schedule an event and Log a phone call: each exchange is recorded in the timeline.
E. Assess and follow up: Add an Evaluation, run a Reference check, Add a task and Send a form.
F. Export and share: Export using Template to a PDF, and Share Candidate.
G. Disqualify: removes the candidate from the job's process, with a reason.
H. Other Actions: AI-powered resume analysis, data consent request, copy to another job, vCard download, WhatsApp chat and sequence enrollment. The last entry, Configure actions layout, lets you choose which actions appear in the bar and which stay in this menu.
I. Next step: the same button as marker 14.
Learn more
- Updating the recruitment process in Nicoka: create or rename the pipeline steps.
- Choosing the sections of the application panel in Tiles view.
- Open the job description from a job's pipeline.