Expense reports: entering, submitting, approving and setting up
The Expense reports module works in two steps. You record your expenses as you go, from your computer or the mobile app, with their receipt. Then you group them in an expense report, which you send for approval. This guide follows the employee, then the manager and accounting, then the module settings. The screenshots show the French interface; the labels of the expenses page are displayed in French, they are quoted here as they appear, with their meaning.
1. The My expense reports screen
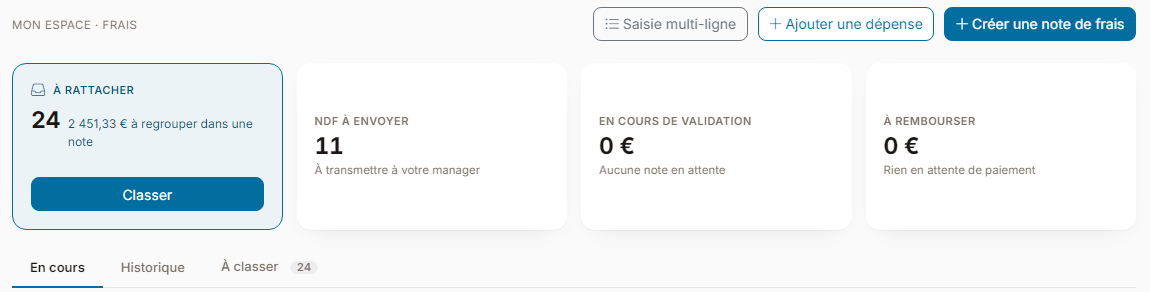
Open My HR Space > My Expenses Sheets. Four counters sum up your situation:
- À rattacher (to file): the expenses entered that are in no report yet, with their amount. The Classer (file) button opens them.
- NDF à envoyer (reports to send): the reports created but not yet sent to your manager.
- En cours de validation (being approved): the amount of the reports waiting for a decision.
- À rembourser (to be repaid): the approved amount not paid to you yet.
Below, the En cours (ongoing) tab lists your active reports, Historique (history) the closed ones, and À classer (to file) the pending expenses. In these lists, each expense shows an icon: a paperclip when the receipt is attached, a warning triangle when it is missing, a star when the expense was read automatically.
At the top right, three buttons: Ajouter une dépense (add an expense, section 2), Créer une note de frais (create an expense report), which opens the À classer tab to group your expenses (section 3), and Saisie multi-ligne (multi-line entry), to enter several expenses at once (section 4).
2. Adding an expense
This is the recommended method: enter each expense as you go, right after the meal or the toll, while you still have the receipt at hand. Click Ajouter une dépense (add an expense). The panel first offers to drop the receipt (JPG, PNG or PDF):
- with a receipt, Nicoka reads it with its AI and pre-fills the supplier, the date, the amount, the currency, the VAT and the expense type. Always check the proposed values before saving;
- without a receipt, click Saisir sans justificatif (enter without receipt) and fill in the fields yourself.
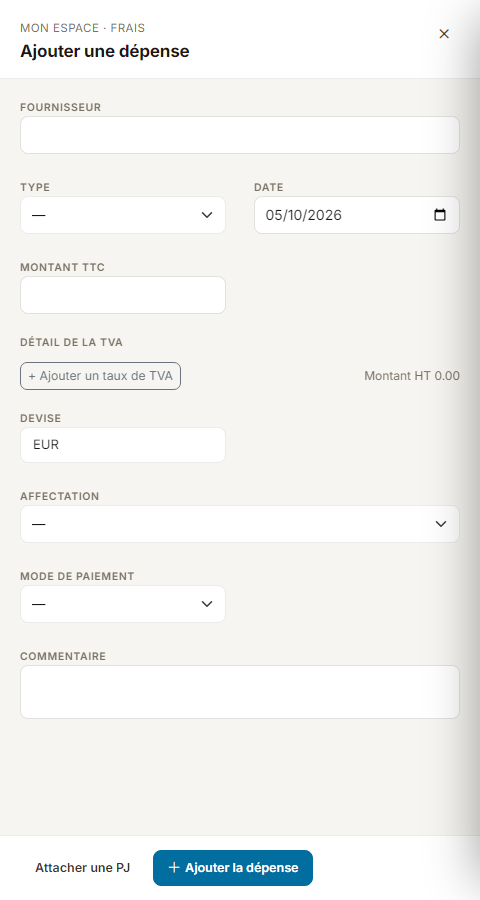
The fields of the expense:
- supplier, type, date and amount including VAT;
- VAT detail, if the option is enabled: adding several VAT rates splits one receipt, for example food and drinks at a restaurant;
- currency, editable if your company allows other currencies than its own;
- assignment: the project or customer the expense relates to;
- payment mode, if the option is enabled: card, cheque, cash…, from the list set by your company;
- a comment (purpose, attendees…), and an extra attachment if needed.
Depending on the type, other fields appear. For mileage, you enter a distance in km, which Nicoka can also compute from the departure and arrival places when this service is set up on your workspace, and the computed amount is shown according to the scale. For some types, such as a meal, you add guests, employees or contacts, sometimes required; candidates from the Recruitment module are offered too when your administrator has enabled the Offer candidates as guests option (section 7), for users allowed to see candidates. The type may also enforce a minimum or maximum amount, or a receipt.
Click Ajouter la dépense (add the expense): it joins the À classer tab. Expenses entered from the mobile app land in the same place.
3. Grouping expenses in an expense report
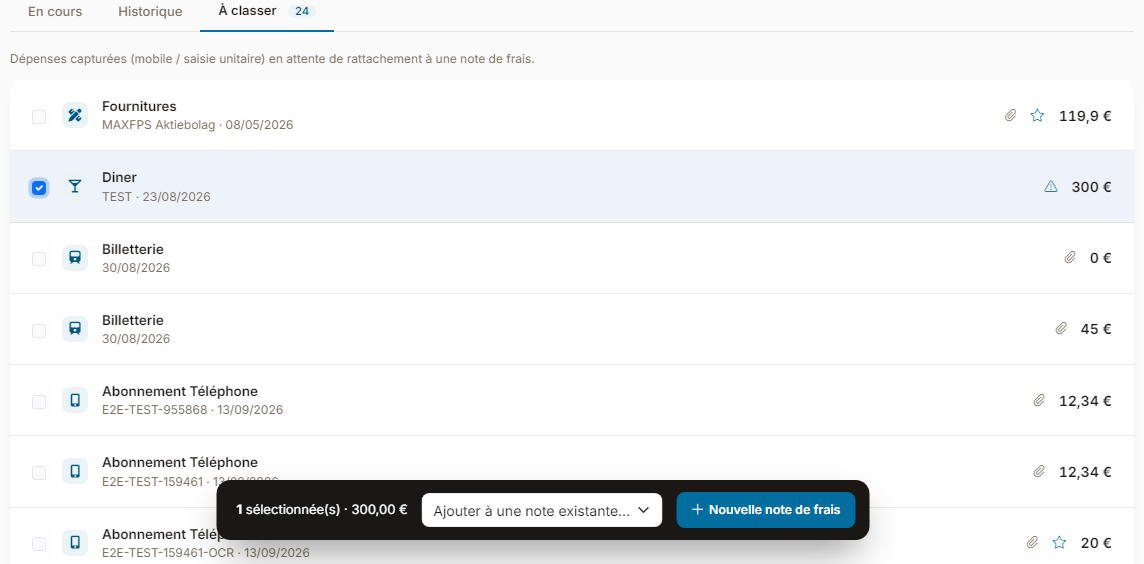
Open the À classer tab (or click Créer une note de frais, create an expense report). Tick the expenses to group: a bar shows how many are selected and their total. Then choose:
- Ajouter à une note existante… (add to an existing report) to complete a report that can still be changed;
- Nouvelle note de frais (new expense report) to create one.
All the expenses of one report must be in the same currency.
4. Entering several expenses at once
Back from a trip, the Saisie multi-ligne (multi-line entry) button opens a table that directly creates an expense report with all its expenses:
- Affectation (assignment): the reference (project, customer) and the company of the report;
- Joindre un justificatif (attach a receipt): the + button attaches one or more documents to the whole report;
- one line per expense: date, type, distance, departure and arrival for mileage, amount, currency, payment mode, guests and comments;
- Ajouter une ligne (add a line) for one more expense, Supprimer les lignes (delete lines) to remove the ticked lines;
- the Total line adds up distances and amounts.
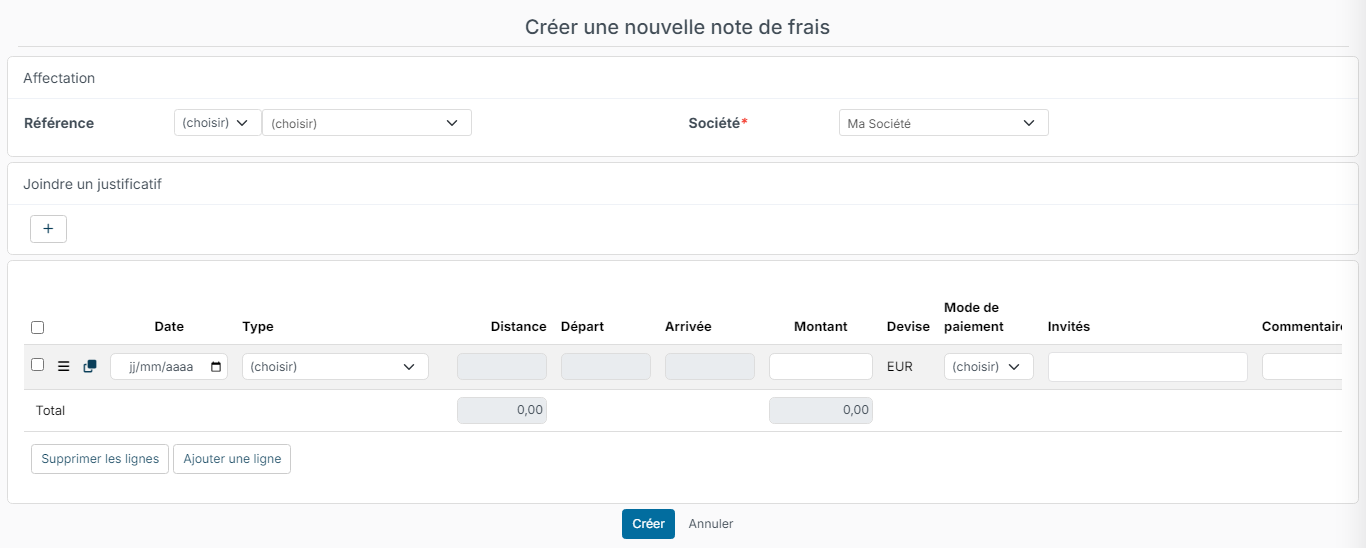
Click Créer (create) to save the report, or Annuler (cancel) to give up. This table does not read receipts: automatic reading happens from Ajouter une dépense.
5. Sending the report for approval
Click a report in the En cours tab: its detail opens on the right, with its status, its assignment (reference and period, saved with the assignment button) and the list of its expenses. Until it is sent, the report has the Nouveau (new) status. Check the label, date and amount of each expense, and that no receipt is missing. Then click Envoyer pour validation (send for validation), and confirm.
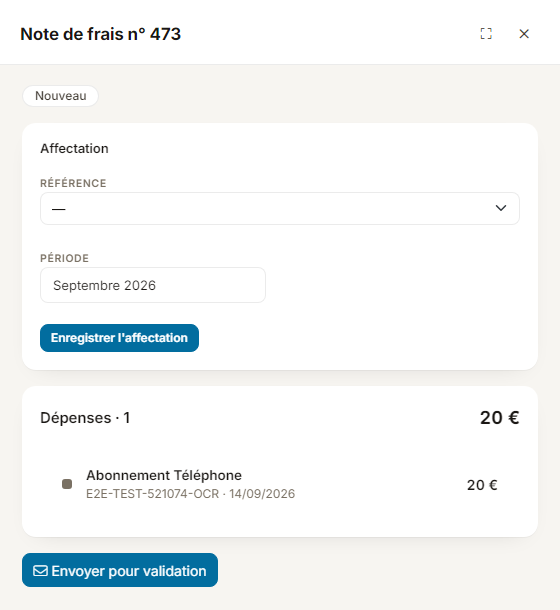
Sending is only possible during the sending period set by your company. During approval, the report can no longer be changed. If it is refused, it becomes editable again: correct it and send it again. The counters follow the report: it leaves NDF à envoyer for En cours de validation, then, once approved, shows in À rembourser until it is paid.
Sealed receipts: when the report is sent, Nicoka turns each receipt into a digital copy that meets the technical requirements of the French arrêté of 22 March 2017. A photo (JPG, PNG) is converted to PDF/A-3 without altering the image, each receipt gets a digital fingerprint time-stamped by an independent authority and Nicoka's electronic seal, and it can no longer be rotated or replaced. If the report is refused, delete the wrong receipt and attach a new one. These copies let you stop keeping paper receipts, provided your company has documented its digitisation procedure: check with your accountant.
6. Approving, paying and exporting
When a report is sent, the approvers of the first step of the circuit receive a notification in Nicoka and an email. All pending requests are gathered in My Team > A valider (approvals to do), where you approve or refuse without opening each report.
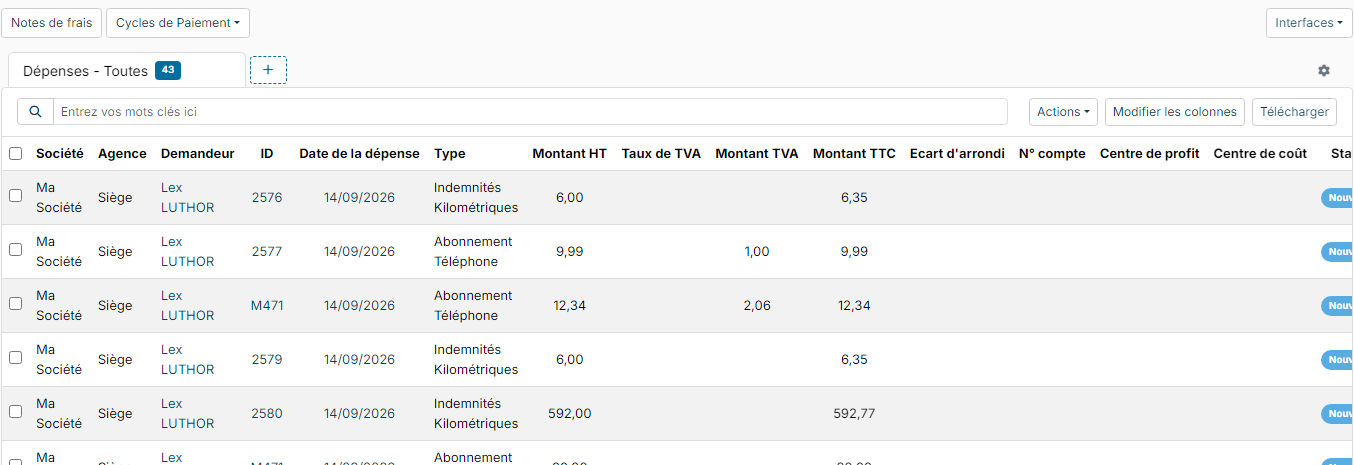
My Team > Expenses lists all the expenses in your scope, with their amounts excluding VAT, VAT and including VAT, their accounting accounts and their status. From this screen:
- the expense reports button shows the same information report by report;
- payment cycles and the bulk payment action are used to repay approved reports. See Paying expense reports;
- Interfaces offers the accounting export and the download of the receipts.
7. Setting up the module
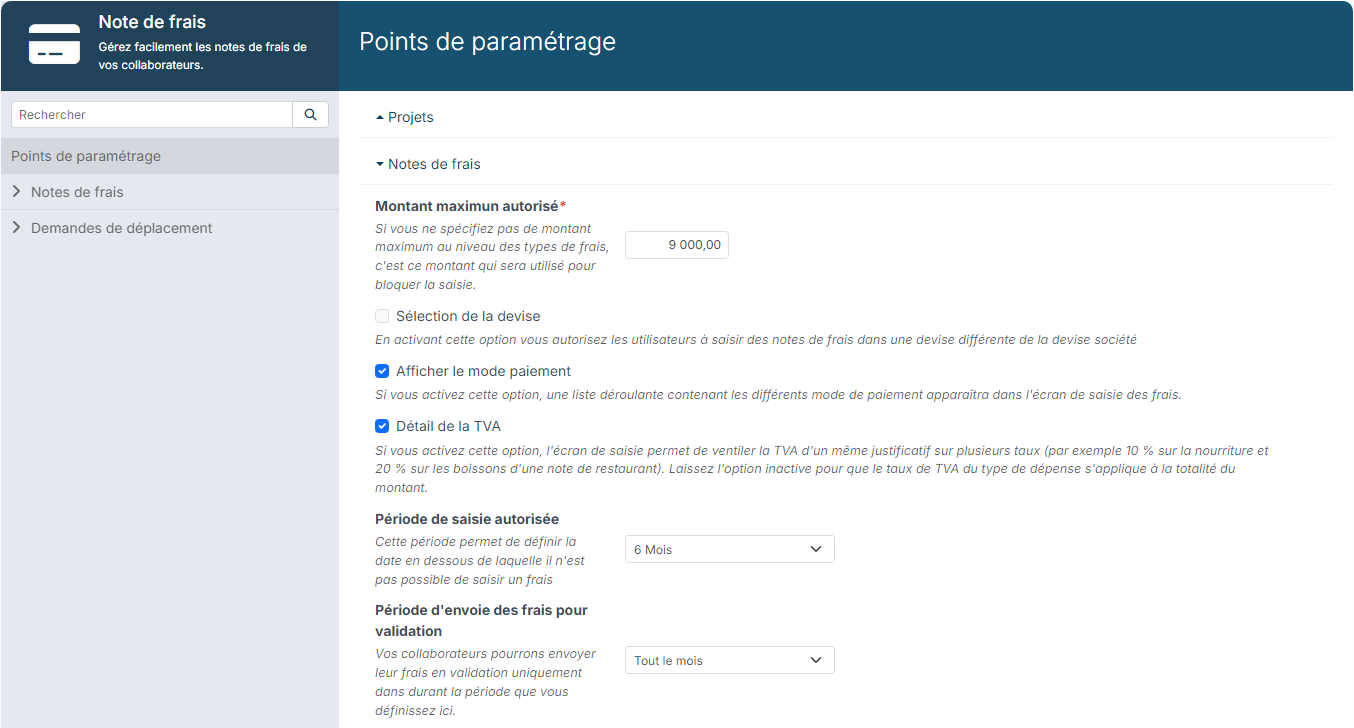
Open Customizing > Modules and click Customizing on the Expense reports card.
Customizing points:
- Maximum authorized amount: the cap applied to types without their own maximum;
- Offer candidates as guests: also offers the candidates of the Recruitment module in the Guests field, to users allowed to see them (off by default);
- Enable Currency Selection: allows entries in another currency than the company's;
- Enable Payment Mode;
- VAT detail: splitting one receipt over several rates;
- Entry Period: the maximum age of an expense, for example 6 months;
- Send for validation Period: when employees may send their reports;
- Sceller les justificatifs des notes envoyées (seal the receipts of submitted reports): on by default, it produces the compliant copies described in section 5. Untick it if you do not want receipts to be converted and frozen when a report is sent;
- in the neighbouring blocks: the project types allowed for the assignment, and the expense advances of the Travel requests module.
The expense reports section of the menu gathers the expense Types, the Workflows (approval circuit, steps, approvers and notifications), the Currencies, the References, the report Numbering, the Payment Modes, the Fiscal Scales of mileage allowances, the VAT rates, the PDF / DOCX export Templates and the Interfaces.
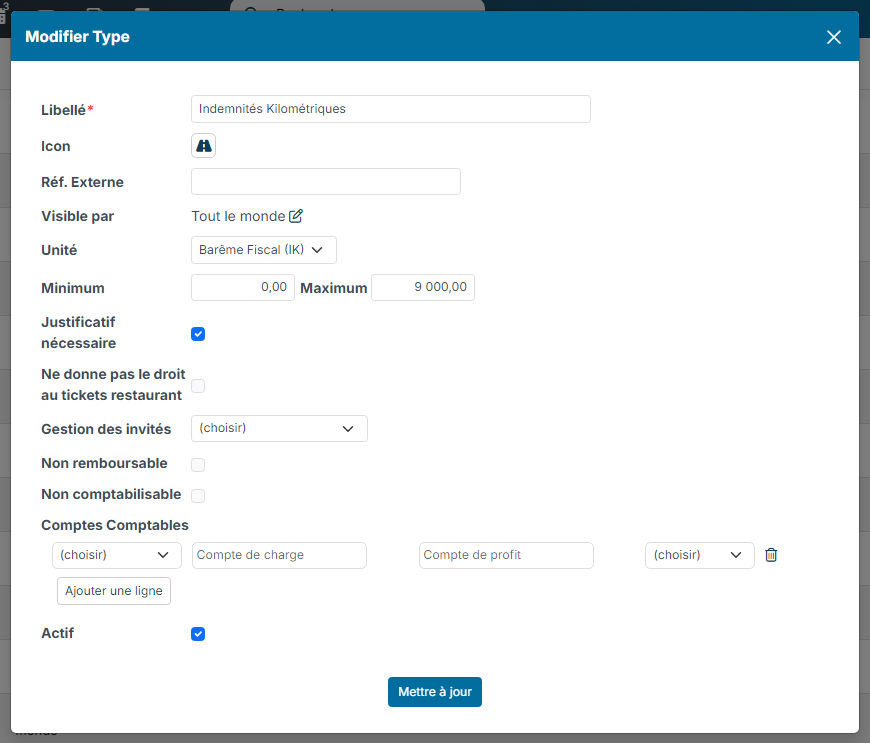
For each expense type, you set:
- the label, the icon and an External Reference for your interfaces;
- Visible by: who may use the type (everyone, departments, profiles, people…);
- the Unit: Amount, Formula (a calculation from rules) or Fiscal Scale for mileage allowances;
- the minimum and the maximum;
- Document required, Does not give the right to Lunch Vouchers, Non refundable, Non accountable;
- Partners Management: allow or require guests;
- the accounting accounts, per company: expense account, profit account and VAT rate, used for the net / VAT split and for the accounting export.